User Guide

- 1. Introduction
- 2. Class-ify’s Application Window
- 3. Quick Start
- 4. Features
- 5. FAQ
- 6. Command Summary
- 7. Glossary
1. Introduction
1.1 What is Class-ify
Class-ify is a class management application built specially for Singapore Ministry of Education (MOE) teachers to monitor their student’s academic progress easily. Teachers can generate exam statistics for each class, and Class-ify quickly flags out students who require more support for contacting.
1.2 Who is this guide for
Are you a teacher looking to use Class-ify to manage your classes? Well, look no further! This user guide will get you started in no time and be your guiding light as you navigate through Class-ify’s features. For a quick start guide, head over to Quick Start. To learn about Class-ify’s features, head over to Features for more information.
1.3 How to use this user guide
Class-ify uses a Command Line Interface (CLI), which may be new to some users. If you are a new user, we strongly recommend you to look through the user guide from start to end to fully understand how to use Class-ify. However, you may also choose to skip to the relevant sections described below:
- Refer to our Table of Contents to easily navigate between sections of the User Guide. There is also a link at the end of every section to bring you back to the Table of Contents.
- Refer to our Quick Start guide to learn how to set up Class-ify.
- Refer to our Features section to learn in detail the different features and commands available in Class-ify.
- Refer to our FAQ for answers to frequently asked questions about how to use Class-ify.
- Refer to our Command Summary to have a quick overview of the different commands and their respective formats.
- Refer to our Glossary to learn key terms that are used in this User Guide.
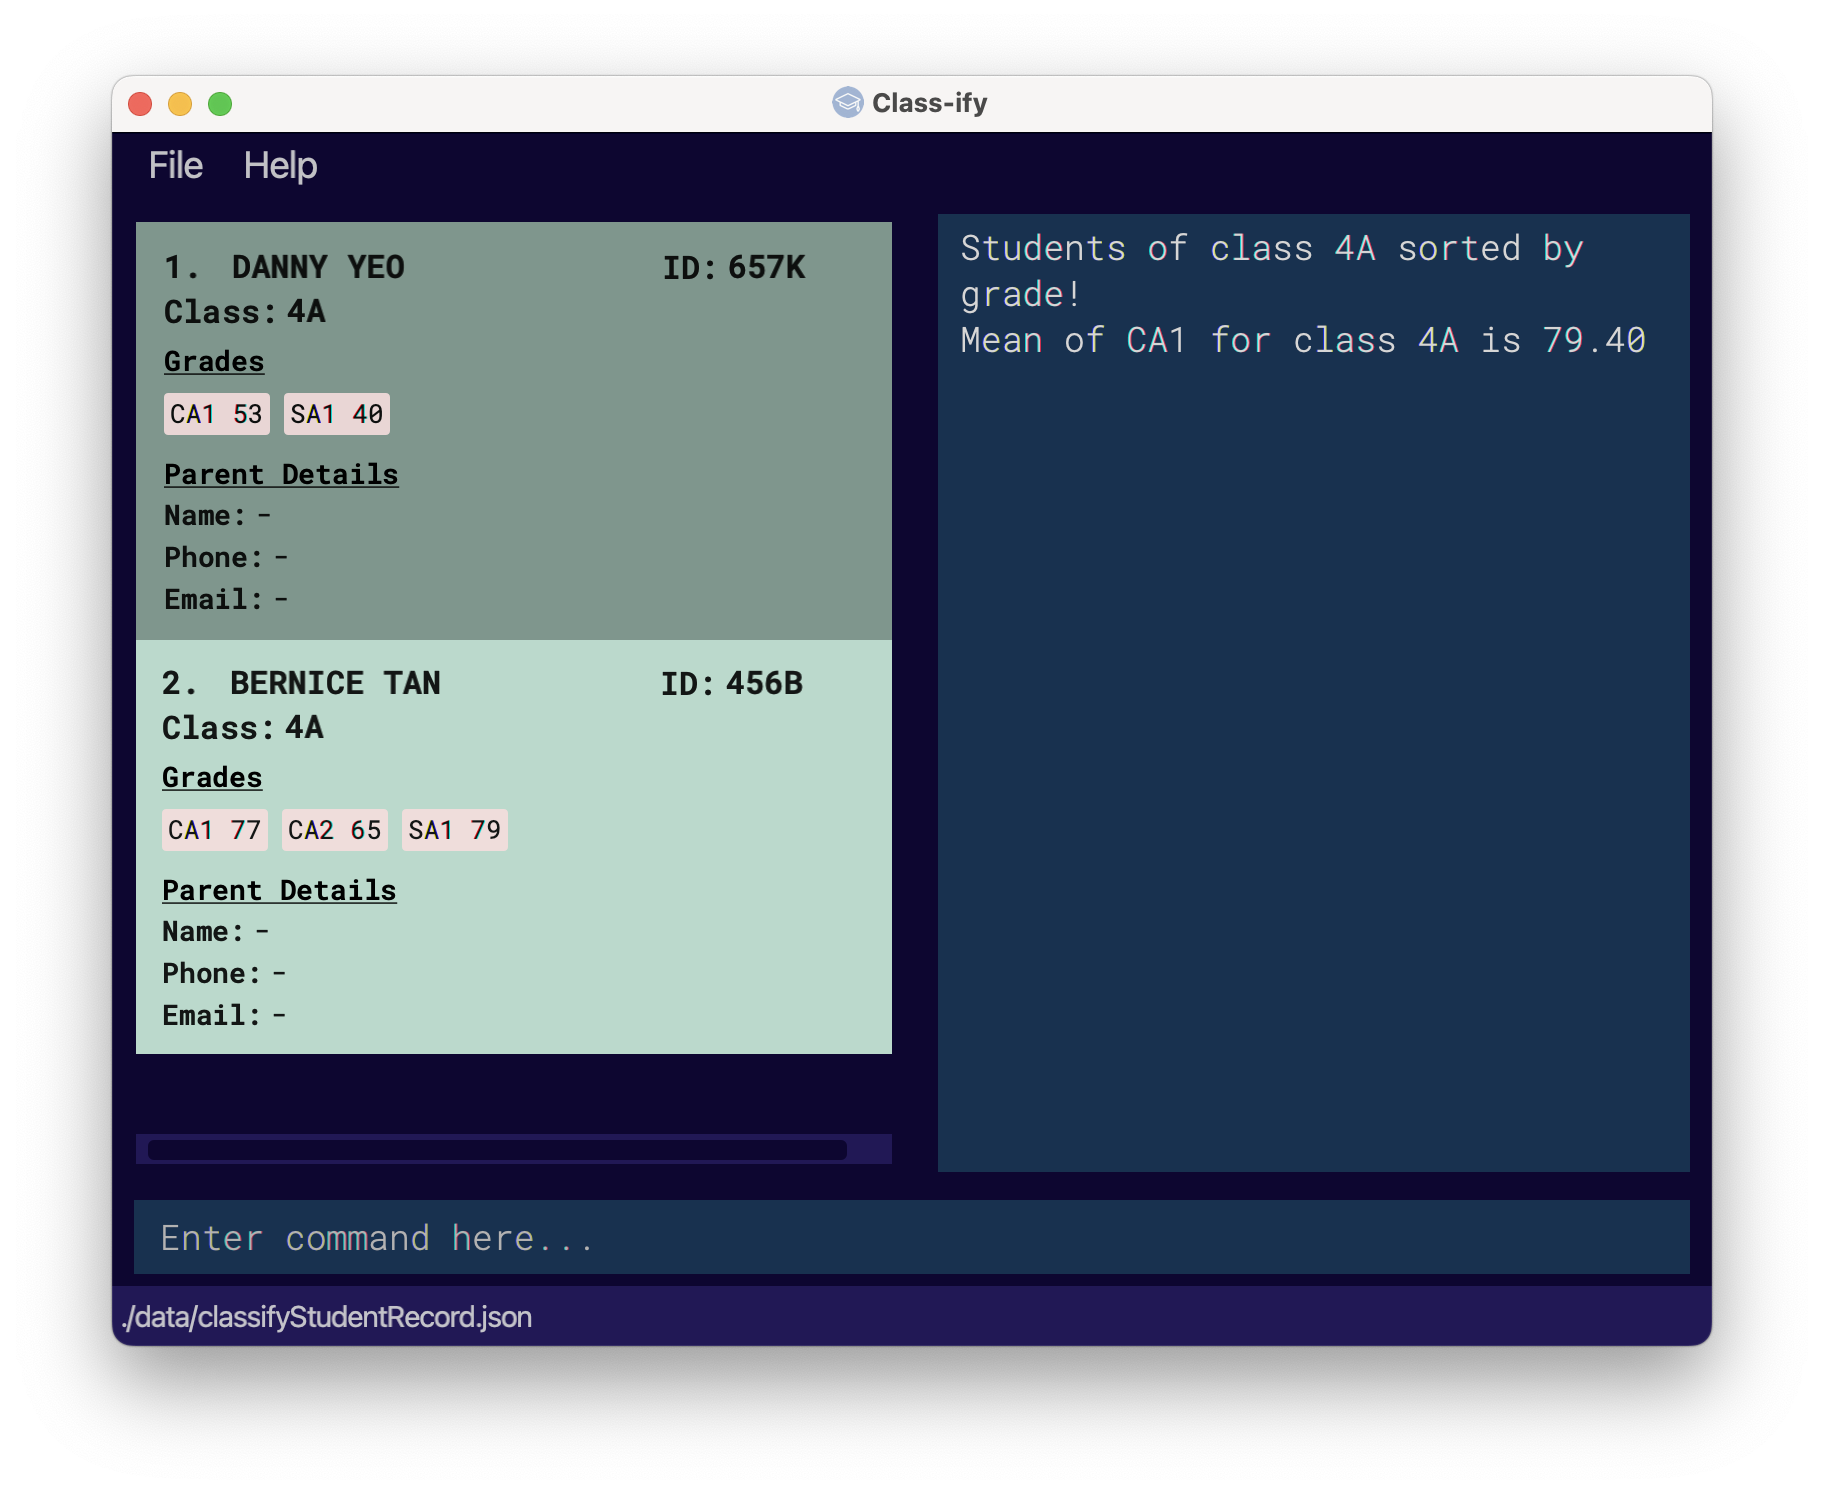
2. Class-ify’s Application Window
This section introduces the different components of Class-ify’s application window and their functions.

| No. | Component | Description |
|---|---|---|
| 1 | Toolbar | Provides convenient access to frequently used commands. |
| 2 | Student List Panel | Displays the list of students. You can manage this display to suit your needs. |
| 3 | Student Card | Displays the information of a student. The information includes the student’s name, ID, class, grades, and parent details. |
| 4 | Result Box | Displays the system message after the execution of a command. The system message describes the outcome of the entered command. |
| 5 | Command Box | Type in your commands here. |
| 6 | Storage File Location | Displays the location of the data file on your computer. |
3. Quick Start
-
Ensure you have Java 11 or above installed in your Computer.
-
Download the latest
classify.jarhere. -
Copy the file to the folder you want to use as the home folder for Class-ify.
-
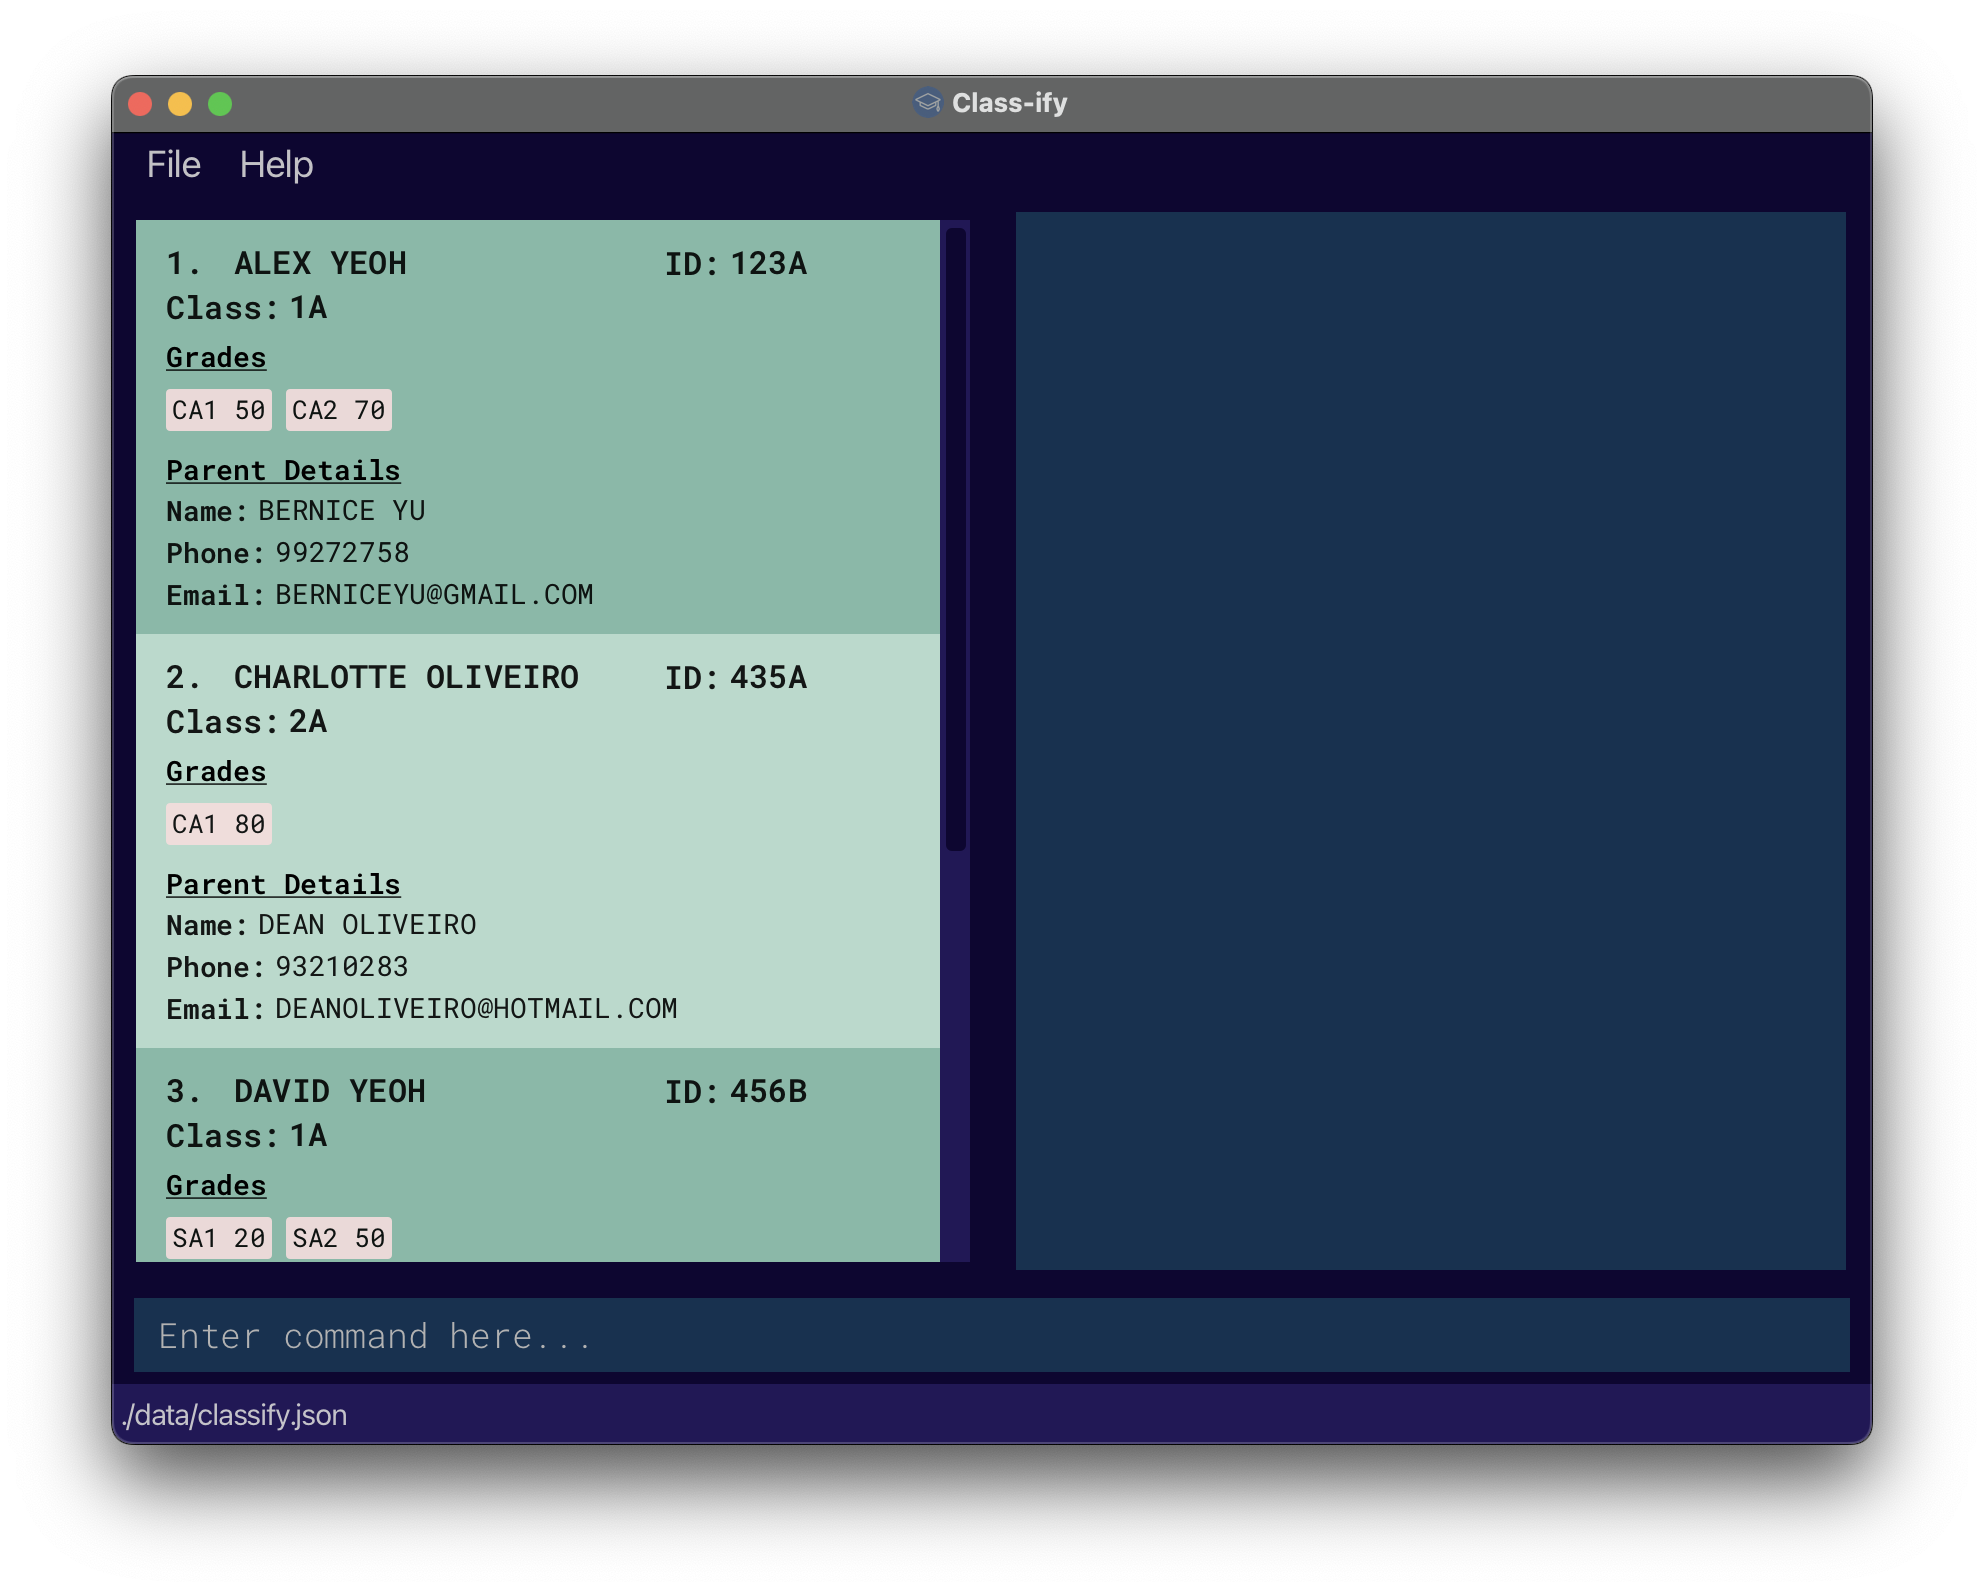
Double-click the file to start the app. The Graphical User Interface (GUI) shown in the image below should appear in a few seconds. Note how the app contains some sample data. In the event that the app does not launch, click here for instructions on how to troubleshoot.
-
Type the command in the command box and press Enter to execute it. E.g. entering
helpwill open the help window.
Here are some example commands you can try:
-
addStudentnm/John Doe id/928C class/1A pn/Bob Doe hp/98765432 exam/CA1 90: Adds a new student namedJohn Doewith his details to Class-ify. -
viewAll: Shows a list of all student records. -
deletenm/Jonathan Tan: Deletes the student record with name of student as ‘Jonathan Tan’. -
clear: Clears all student records. -
exit: Exits the application.
Click here to return to the top.
4. Features
Before you begin reading, here are some special notations to help you along the way.
Tips
Tips are useful suggestions that will help you have a better experience with Class-ify.
Notes
Notes are important information that you should pay attention to when using Class-ify.
Caution
Cautions are around to warn you of potential pitfalls that new users may encounter. For example, commands like clear
will delete all data stored locally and this action is irreversible. You will lose your data permanently.
4.1 Notes on the command format
![]() Note:
Note:
-
Command Words
- Command words and prefixes are case-sensitive.
- E.g.
eXitwill not be accepted as theexitcommand.
- E.g.
- Only the last occurrence of a repeated prefix input will be taken.
- E.g.
edit 1 nm/Jonathan nm/Ethan nm/Aliceis the same asedit 1 nm/Alice.
- E.g.
- Command words and prefixes are case-sensitive.
-
Parameters
- Words in
UPPER_CASErefers to input from the user.- E.g. For the
viewClasscommand, the command format isviewClass CLASS.
CLASSrefers to the user input which can beviewClass 17S68.
- E.g. For the
- Parameters with a prefix can be written in any order.
- E.g.
edit 1 nm/Jack id/111Ais the same asedit 1 id/111A nm/Jack.
- E.g.
- Additional parameters for commands that do not require parameters will be ignored.
- E.g.
exit hello123will be accepted as theexitcommand.
- E.g.
- Optional parameters are indicated by square brackets
[].- E.g. For the
addStudentcommand, the command format isaddStudent nm/STUDENT-NAME id/ID class/CLASS [pn/PARENT-NAME] [hp/PHONE-NUMBER] ...
[pn/PARENT-NAME]and[hp/PHONE-NUMBER]refer to optional parameters that can be supplied by the user.
- E.g. For the
- Words in
4.2 Managing student records
4.2.1 Adding a new student record : addStudent
Description
Creates a new student record with the following parameters:
| Parameter | Prefix | Compulsory | Description |
|---|---|---|---|
| Name | nm/ |
Yes | Student’s name should be alphanumeric, consisting of both letters and numbers only. As student names are treated as unique, we recommend you to use the full name of the student. For optimal viewing, the length of the name should be at most 17 characters. Any longer would result in the name being cut off from the application display, though it will not affect the actual record being saved in the application. |
| ID | id/ |
Yes | Student’s id should contain 3 digits followed by 1 character (e.g. 123A). Do note that ids are unique, hence no two students should have the same ids. |
| Class | class/ |
Yes | Class name should be alphanumeric, consisting of both letters and numbers only. |
| Exam | exam/ |
No | Exams should follow the format exam name followed by score (e.g. CA1 90). Current accepted exam names are CA1, CA2, SA1 and SA2. Future versions may allow custom exam or gradable items to be created.In addition, scores should be an integer value between 0 to 100. Partial scores are currently not accepted. |
| Parent’s Name | pn/ |
No | Name of student’s parent. Similar to the student’s name, the parent’s name should be alphanumeric also. |
| Parent’s Mobile | hp/ |
No | Mobile number of student’s parent. It should only contain numbers, and it should be at least 3 digits long. Entries with country code can be prefixed without the plus sign. For example, +65 91234567 can be entered as 6591234567 instead. |
| Parent’s Email | e/ |
No | Email address of student’s parent should follow standard convention format local-part@domain. |
nm/john and nm/JoHn
are treated as JOHN by default.
Usage
At the start of every teaching year, add in your new batch of students to Class-ify for easy tracking.
Format: addStudent nm/STUDENT-NAME id/ID class/CLASS [exam/EXAM-NAME SCORE] [pn/PARENT-NAME] [hp/PHONE-NUMBER]
[e/EMAIL]
Examples:
addStudent nm/Peter Tan id/452B class/1FaddStudent nm/Alex Yeoh id/123A class/2B exam/CA1 60 exam/CA2 70addStudent nm/John Doe id/928C class/1A pn/Bob Doe hp/98765432 e/bobdoe@gmail.com exam/CA1 50
exam/CA1 50 exam/SA1 60 exam/CA1 80 will add
grades 80 for CA1 and 60 for SA1. Notice the first score for CA1 is overridden by the second score for CA1.

4.2.2 Editing a student record : edit
Description
Edits the respective details of an existing student.
- Edits the student at the specified
INDEX. The index refers to the index number shown in the current displayed list. The index must be a positive integer. E.g. 1 or 2. - Existing values will be updated to the new input values.
- Refer to the complete list of tags for each field under
addStudentcommand.
Usage
There are three scenarios when you may need to use this command:
- When you wish to add the parent’s information for a student.
- When you have completed marking the exam papers and want to add in your students’ grades.
- When there is a mistake in a student record, and you wish to update it.
Format: edit INDEX [nm/STUDENT-NAME] [id/ID] [exam/EXAM-NAME SCORE] [pn/PARENT-NAME] ...
Examples:
-
edit 1 exam/CA2 70 exam/SA1 60adds or updates the CA2 and SA1 exam grades of the 1st student to be 70 and 60 respectively. -
edit 2 nm/Jacob Teoedits the name of the 2nd student to Jacob Teo.
4.2.3 Deleting a student record : delete
Description
Deletes an existing student record from the class list, using the student’s name or the student’s ID.
Usage
In the event that a student is no longer in your class, you may use this command to delete his/her student record from the list.
Format: delete nm/STUDENT-NAME or delete id/ID
Examples:
-
delete nm/Jonathan Tandeletes student record with student name as Jonathan Tan. -
delete id/123Adeletes student record with student ID as 123A.
nm/john and nm/JoHn
are treated as JOHN by default.
4.2.4 Clearing all student records : clear
Description
Clears all student records from local storage.
Usage
There are two scenarios when you may need to use this command:
- When you first download Class-ify and want to delete the existing sample data.
- When you are no longer teaching any of the students in the list.
You may use this command to clear all student records and start afresh.
Format: clear
4.3 Managing display of student records
4.3.1 Viewing all student records : viewAll
Description
Shows a list of all student records in Classify.
Usage
In the event that the list is only showing student records from a particular class after you have used the
viewClass command below, you may use this command to display
the full list of student records again.
Format: viewAll
4.3.2 Viewing student records from a class : viewClass
Description
Shows a list of all students in the specified class.
Usage
In the event that your list contains many student records from different classes, and you wish to see student records from a particular class only, you may use this command to do so. The command result will also tell you how many students are in the class.
Format: viewClass CLASS
- Class name can only contain alphanumeric characters.
- Class name is case-insensitive.
Example:
-
viewClass 1Adisplays the list of students in Class 1A

4.3.3 Finding a student record : find
Description
Searches for students whose name contains the specified name keywords, or whose ID matches the given ID.
Usage
There are a few scenarios when you may want to use this command:
- When you are relatively unfamiliar with the class, and need to access certain information about a particular student.
- When you want to edit a student’s details using the
editcommand, running the find command first would simplify the process.
find command searches through either the students’ names, or the students’ IDs, but not both. Therefore,
find nm/Alice id/123A is not a valid command.
Format: find nm/STUDENT-NAME or find id/ID
- The search is case-insensitive. E.g hans will match Hans.
- The search only recognises whole words, and searching for substrings is not valid. E.g. Han will not match Hans.
Examples:
-
find nm/leedisplays the list of students with lee in their name.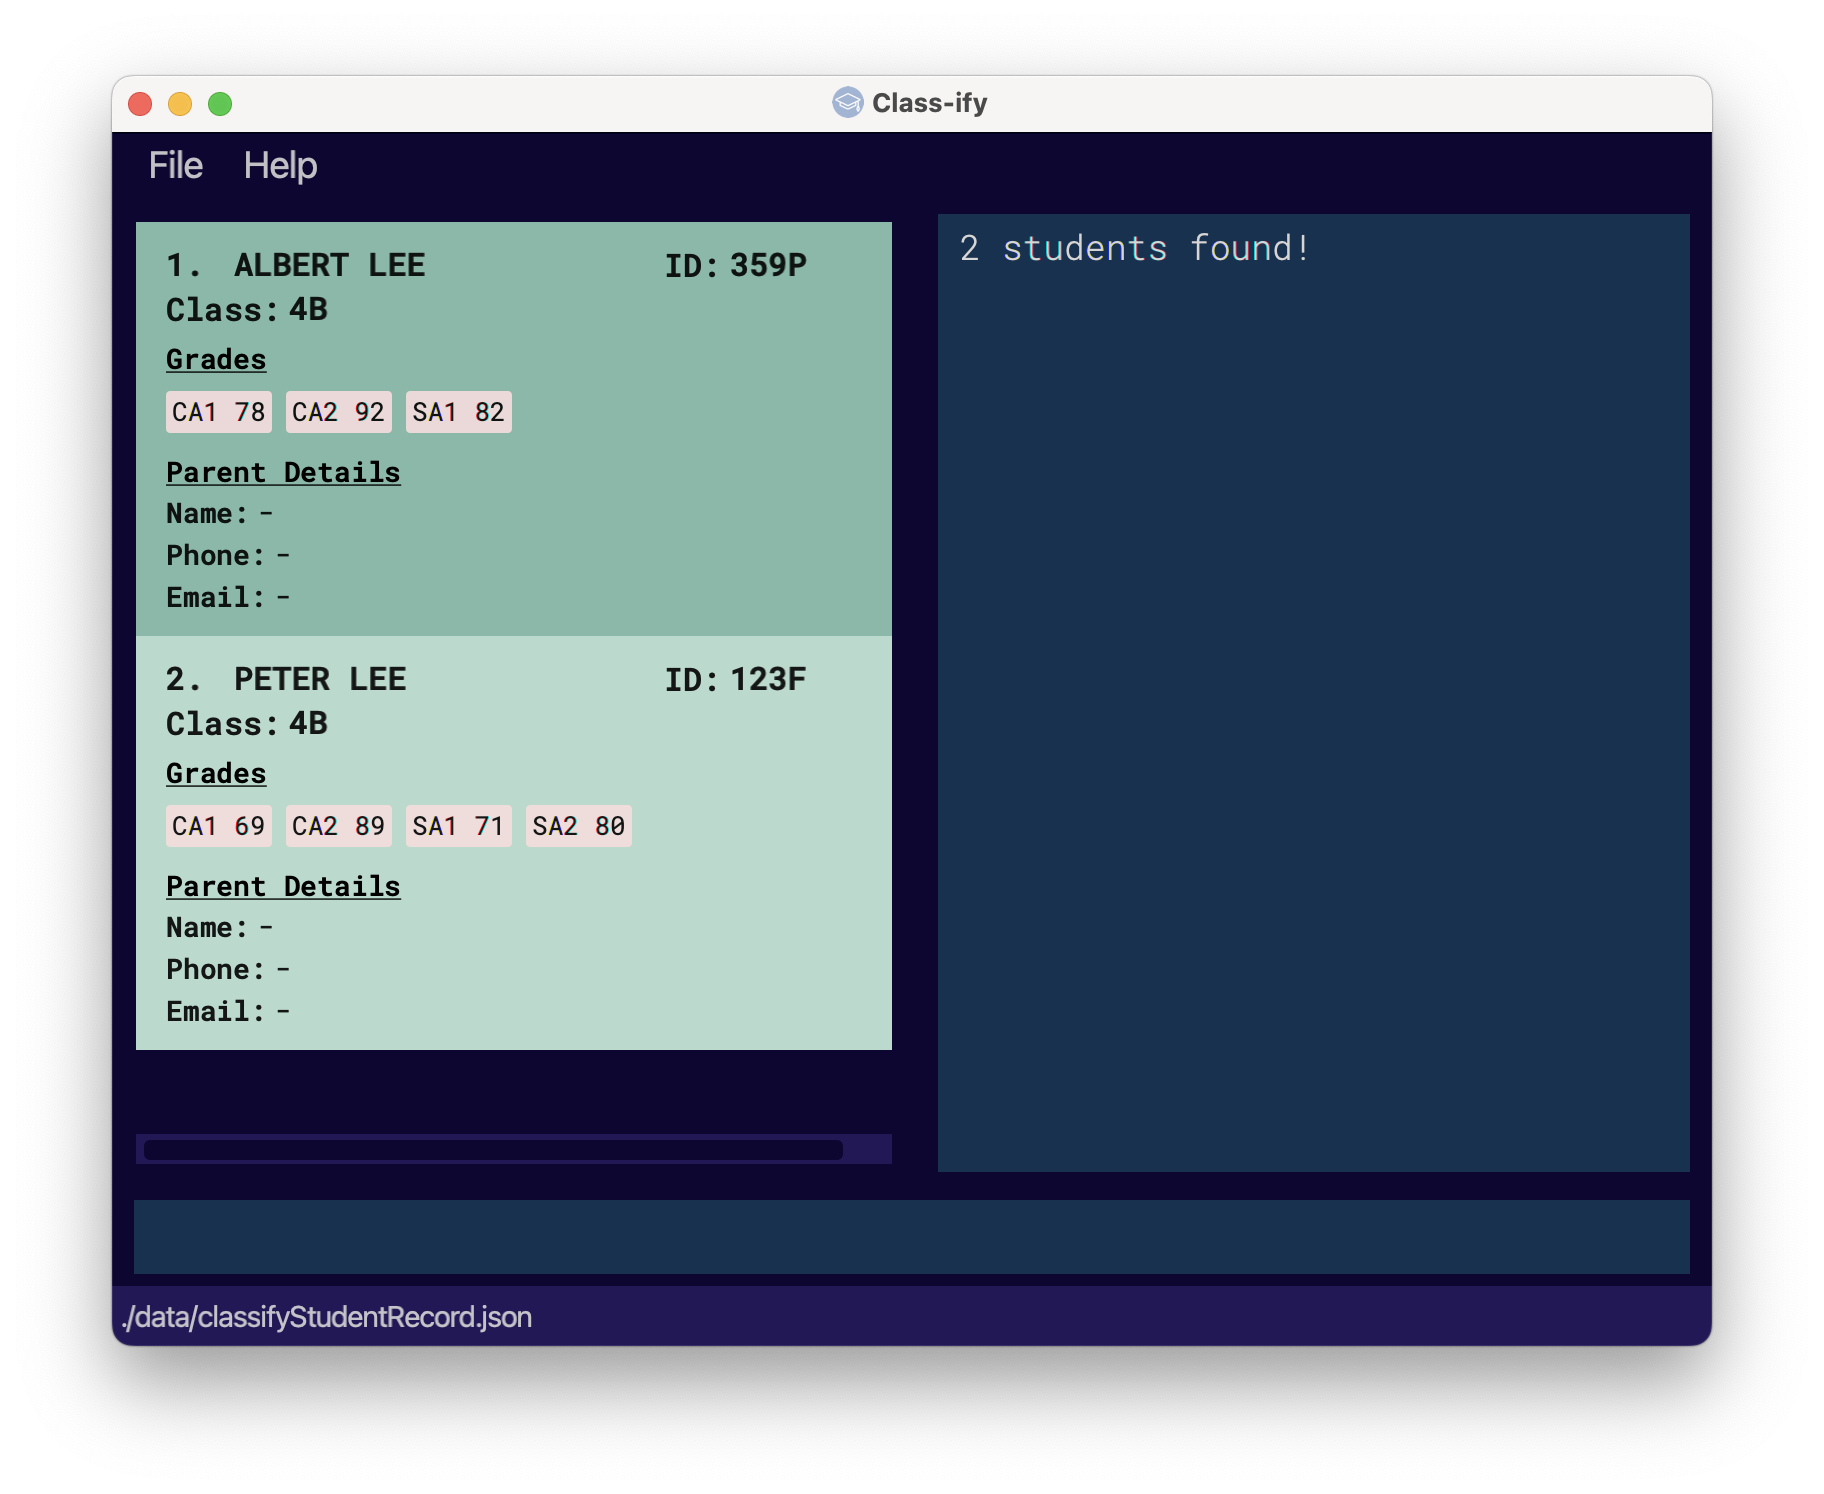
-
find nm/Johndisplays the list of students with john in their name. -
find nm/john alicedisplays the list of students whose name contain john, alice or both. -
find id/123Adisplays the student with 123A as their student ID.
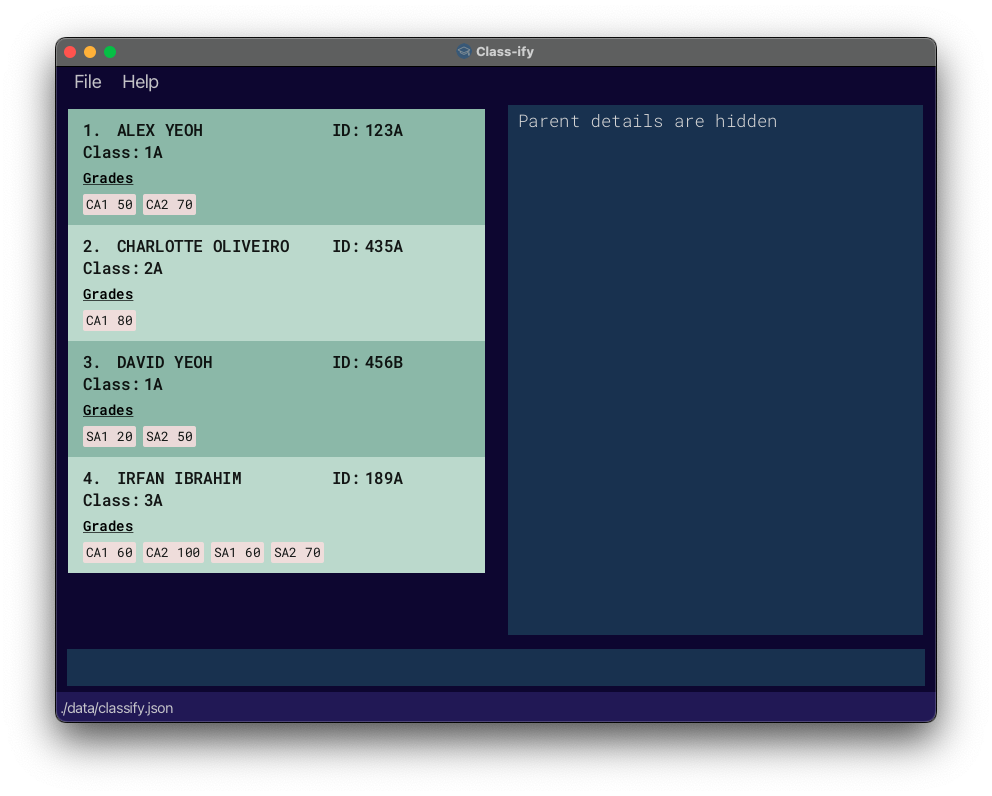
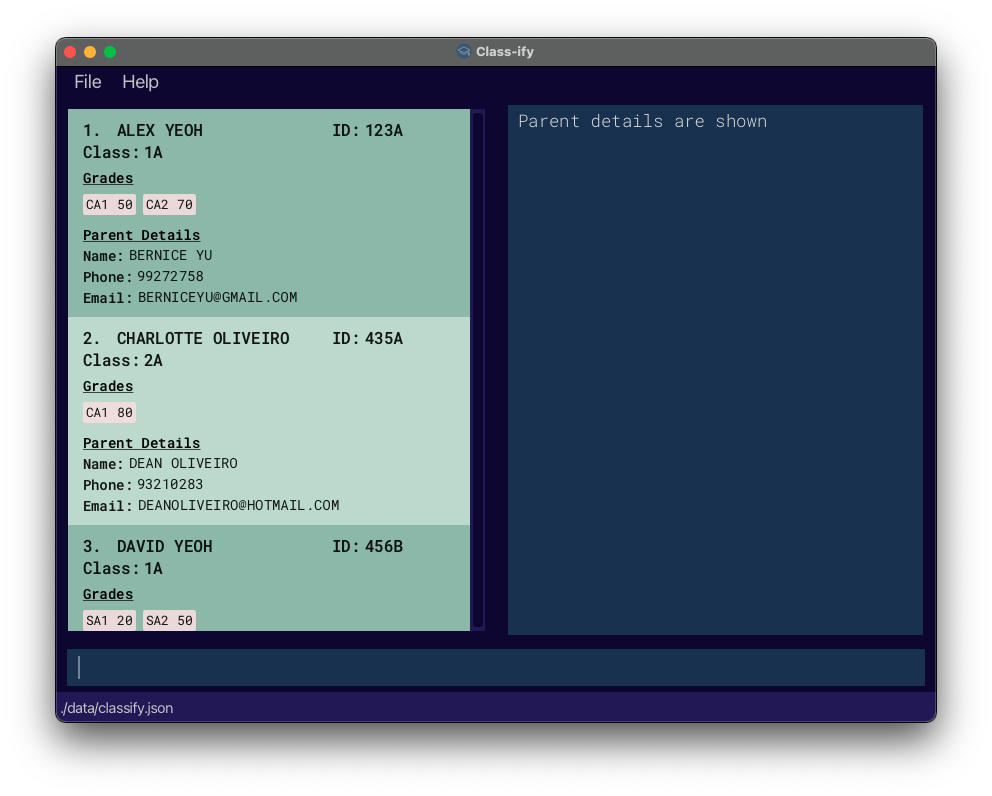
4.3.4 Toggling view : toggleView
Description
Toggles the display between showing and hiding the students’ parent details. If the current view displays the parent details, toggleView will hide the parent details and vice versa.
Usage
There are a few scenarios when you may want to use this command:
- Toggle to hide: When you want an uncluttered view of your students without their parental details.
- Toggle to show: When you want to contact the parent of the student.
Format: toggleView
Concise View
Detailed View
4.4 Exam statistics
4.4.1 Calculating exam statistics: viewStats
Description
Shows a list of students in the specified class, and displays the mean score of the specified exam for that class. If filter is set to ON, only students whose score for the specified exam falls below the mean will be displayed.
The list of students displayed will be arranged in order of ascending grades, using the grade for the specified exam.
Usage
Once you have updated the scores for a recent exam for all students in a particular class, you may use this command to identify students who require additional academic support based on the exam results.
Format: viewStats class/CLASS exam/EXAM-NAME filter/FILTER
- Class name can only contain alphanumeric characters.
- Class name is case-insensitive.
- Exam name should be either CA1, CA2, SA1 or SA2.
- Exam name is case-insensitive.
- Filter is either ON or OFF, and is case-insensitive.
Examples:
-
viewStats class/4A exam/SA1 filter/offdisplays the mean obtained by Class 4A for SA1, as well as the list of all the students in the Class 4A, arranged in ascending grades for SA1. -
viewStats class/4A exam/CA1 filter/ondisplays the mean obtained by Class 4A for CA1, as well as the list of students in Class 4A whose grade for CA1 falls below the mean, arranged in ascending grades for CA1.
4.5 Miscellaneous
4.5.1 Viewing help : help
Description
Shows a summary of all the available commands.
Usage
In case you have forgotten how to use any of the commands in Class-ify, you may use this command to open a window that displays a command summary table.
The image below shows what the help window will look like.
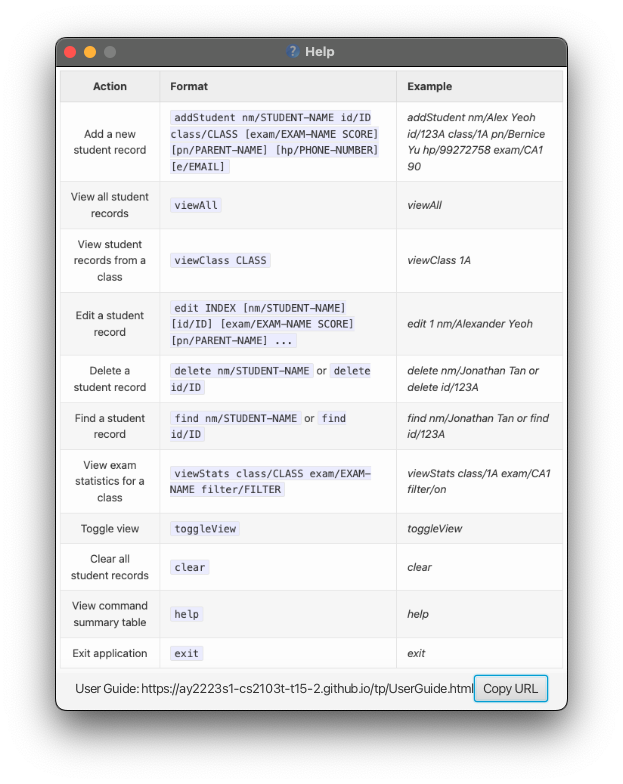
Format: help
4.5.2 Exiting the application : exit
Description
Exits the application.
Usage
When you are done adding or updating student records, you may use this command to exit the application.
Format: exit
Click here to return to the top.
5. FAQ
| Question | Response |
|---|---|
| Do I need to save my data before exiting the application? | Student records are saved locally after any command that changes the data. There is no need to save manually. |
| Why is Class-ify not running? | 1. Put the JAR file in an empty folder in which the app is allowed to create files (I.e. Do not use a write-protected folder). 2. Open Command Prompt if you are using Windows or Terminal if you are using macOS. Run the java -version command to ensure you are using Java 11. Do this again even if you did this before, as your OS might have auto-updated the default Java version to a newer version.3. Launch the jar file using the java -jar classify.jar command. |
| Where can I locate my data file? | You can locate the JSON file in the path [JAR file location]/data/classify.json. We suggest that you do not edit the data file. Class-ify will discard all data and start with an empty data file at the next run if the format of the data file is invalid. |
Click here to return to the top.
6. Command Summary
| Action | Format | Example |
|---|---|---|
| Add a new student record | addStudent nm/STUDENT-NAME id/ID class/CLASS [exam/EXAM-NAME SCORE] [pn/PARENT-NAME] [hp/PHONE-NUMBER] [e/EMAIL] |
addStudent nm/Alex Yeoh id/123A class/1A pn/Bernice Yu hp/99272758 exam/CA1 90 |
| View all student records | viewAll |
viewAll |
| View student records from a class | viewClass CLASS |
viewClass 1A |
| Edit a student record | edit INDEX [nm/STUDENT-NAME] [id/ID] [exam/EXAM-NAME SCORE] [pn/PARENT-NAME] ... |
edit 1 nm/Alexander Yeoh |
| Delete a student record |
delete nm/STUDENT-NAME or delete id/ID
|
delete nm/Jonathan Tan or delete id/123A |
| Find a student record |
find nm/STUDENT-NAME or find id/ID
|
find nm/Jonathan Tan or find id/123A |
| View exam statistics for a class | viewStats class/CLASS exam/EXAM-NAME filter/FILTER |
viewStats class/1A exam/CA1 filter/on |
| Toggle view | toggleView |
toggleView |
| Clear all student records | clear |
clear |
| View command summary table | help |
help |
| Exit application | exit |
exit |
Click here to return to the top.
7. Glossary
- CLI: Command Line Interface (CLI) is a text-based User Interface (UI) used to run programs. Through the CLI, users interact with the application by typing in text commands.
- GUI: Graphical User Interface (GUI) is an interface that allows the user to interact with through various visual graphics.
- Home folder: The home folder refers to the folder on your device that stores the Class-ify application.
- Prefix: Refers to the representative input to indicate a specific type of information in Class-ify.
- Parameter: Refers to additional input that is provided along with the command word.
- Alphanumeric characters: Refers to characters made up of a combination of letters and/ or numbers.
- Local storage: Local storage refers to the data that is stored on your physical device.
- Write-protected: Refers to a system policy that prevents you from writing data to that location.
- URL: Uniform Resource Locators is a web address that opens up a web page when keyed into the browser.
Click here to return to the top.