Developer Guide

- 1. Introduction
- 2. Acknowledgements
- 3. Setting up, getting started
- 4. Design and Implementation
- 5. Documentation, logging, testing, configuration, dev-ops
- 6. Appendix: Requirements
- 7. Appendix: Instructions for manual testing
1. Introduction
1.1 What is Class-ify
Class-ify is a class management application built specially for Singapore Ministry of Education (MOE) teachers to monitor their student’s academic progress easily. Teachers can generate exam statistics for each class, and Class-ify quickly flags out students who require more support for contacting.
1.2 Who is this guide for
- Developers who wish to make sense of the codebase and contribute to Class-ify.
- Advanced users who wish to better understand Class-ify’s features.
1.3 How to use this developer guide
This developer guide covers the architecture, design choices and implementation details in Class-ify to give the reader a clear picture of the technical details and inner workings of Class-ify.
- Refer to our Table of Contents to easily navigate between sections of the User Guide. There is also a link at the end of every section to bring you back to the Table of Contents.
- Refer to our Quick Start guide to set up the project in your computer.
- Refer to our Design and Implementation section to learn in detail how the commands in Class-ify are implemented and the design considerations that went into them.
- Refer to our Documentation, logging, testing, configuration, dev-ops section for the various guides.
- Refer to our Appendix: Requirements section for Class-ify’s requirements.
- Refer to our Appendix: Instructions for manual testing section to learn how to test Class-ify manually.
Click here to return to the top.
2. Acknowledgements
- Class-ify is adapted from the AddressBook-Level3 project created by the SE-EDU initiative.
- Libraries used: JavaFX, Jackson, JUnit5
Click here to return to the top.
3. Setting up, getting started
Refer to the guide Setting up and getting started.
Click here to return to the top.
4. Design and Implementation
4.1 Architecture
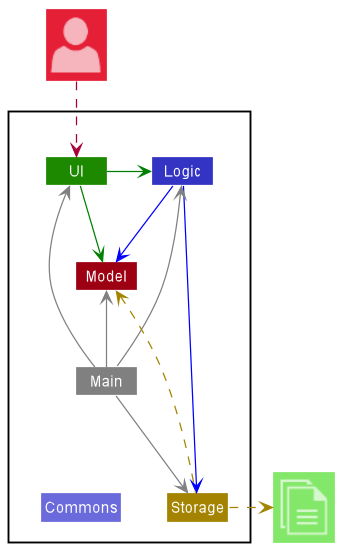
The Architecture Diagram given above explains the high-level design of the App.
Given below is a quick overview of main components and how they interact with each other.
Main components of the architecture
Main has two classes called Main and MainApp. It is responsible for:
- application launch: Initialises the components in the correct sequence, and connects them up with each other.
- application shut down: Shuts down the components and invokes cleanup methods where necessary.
Commons represents a collection of classes used by multiple other components.
The rest of the App consists of four components.
-
UI: The UI of the App. -
Logic: The command executor. -
Model: Holds the data of the App in memory. -
Storage: Reads data from, and writes data to the hard disk.
How the architecture components interact with each other
The Sequence Diagram below shows how the components interact with each other for the scenario where the user issues the command delete id/123A.
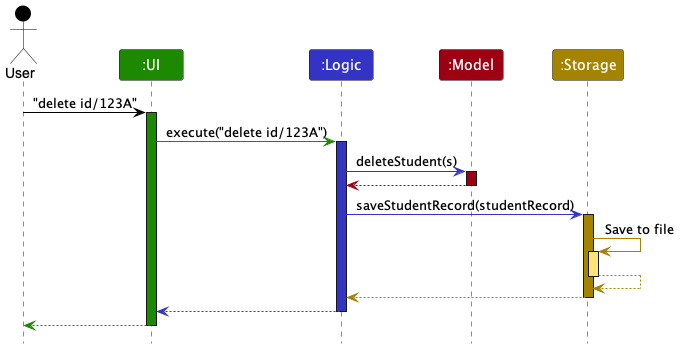
Each of the four main components (also shown in the diagram above),
- defines its API in an
interfacewith the same name as the Component. - implements its functionality using a concrete
{Component Name}Managerclass (which follows the corresponding APIinterfacementioned in the previous point).
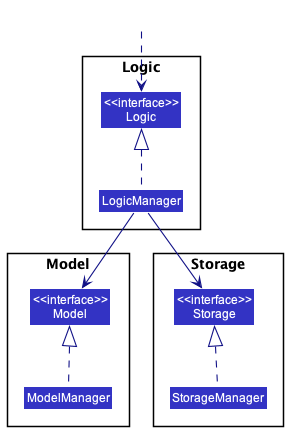
For example, the Logic component defines its API in the Logic.java interface and implements its functionality using the LogicManager.java class which follows the Logic interface. Other components interact with a given component through its interface rather than the concrete class (reason: to prevent outside component’s being coupled to the implementation of a component), as illustrated in the (partial) class diagram below.
The sections below give more details of each component.
4.1.1 UI component
The API of this component is specified in Ui.java
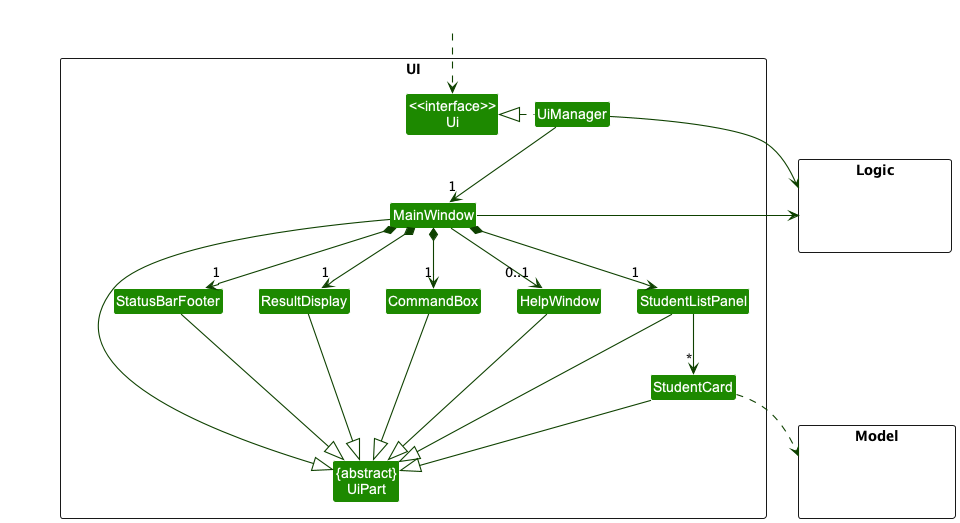
The UI consists of a MainWindow that is made up of parts e.g.CommandBox, ResultDisplay, StudentListPanel, StatusBarFooter etc. All these, including the MainWindow, inherit from the abstract UiPart class which captures the commonalities between classes that represent parts of the visible GUI.
The UI component uses the JavaFx UI framework. The layout of these UI parts are defined in matching .fxml files that are in the src/main/resources/view folder. For example, the layout of the MainWindow is specified in MainWindow.fxml
The UI component,
- executes user commands using the
Logiccomponent. - listens for changes to
Modeldata so that the UI can be updated with the modified data. - keeps a reference to the
Logiccomponent, because theUIrelies on theLogicto execute commands. - depends on some classes in the
Modelcomponent, as it displaysPersonobject residing in theModel.
4.1.2 Logic component
API : Logic.java
Here’s a (partial) class diagram of the Logic component:
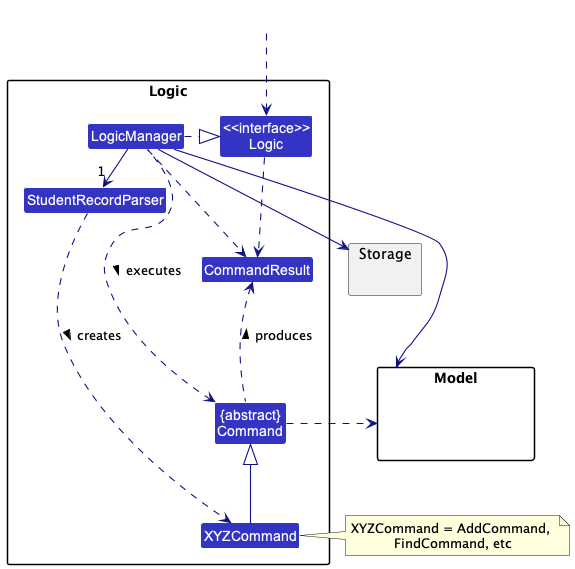
How the Logic component works:
- When
Logicis called upon to execute a command, it uses theStudentRecordParserclass to parse the user command. - This results in a
Commandobject (more precisely, an object of one of its subclasses e.g.,AddCommand) which is executed by theLogicManager. - The command can communicate with the
Modelwhen it is executed (e.g. to add a student). - The result of the command execution is encapsulated as a
CommandResultobject which is returned fromLogic.
The Sequence Diagram below illustrates the interactions within the Logic component for the execute("delete id/123A") API call.
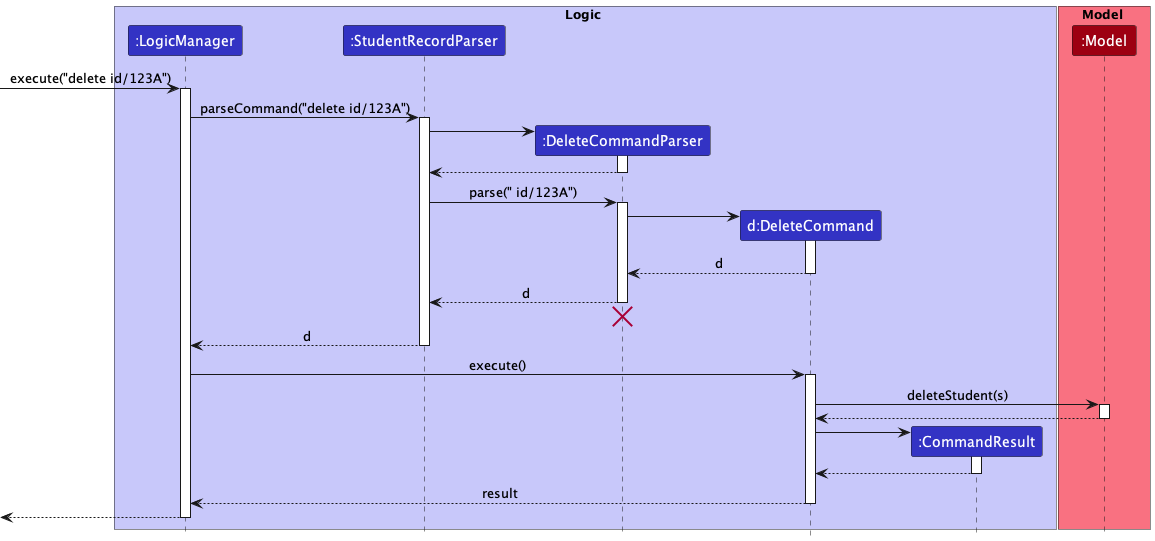
DeleteCommandParser should end at the destroy marker (X) but due to a limitation of PlantUML, the lifeline reaches the end of diagram.
Here are the other classes in Logic (omitted from the class diagram above) that are used for parsing a user command:
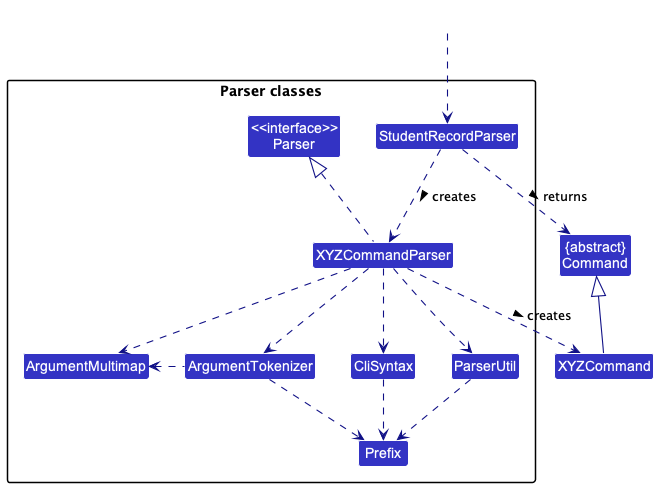
How the parsing works:
- When called upon to parse a user command, the
StudentRecordParserclass creates anXYZCommandParser(XYZis a placeholder for the specific command name e.g.,AddCommandParser) which uses the other classes shown above to parse the user command and create aXYZCommandobject (e.g.,AddCommand) which theStudentRecordParserreturns back as aCommandobject. - All
XYZCommandParserclasses (e.g.,AddCommandParser,DeleteCommandParser, …) inherit from theParserinterface so that they can be treated similarly where possible e.g, during testing.
4.1.3 Model component
API : Model.java
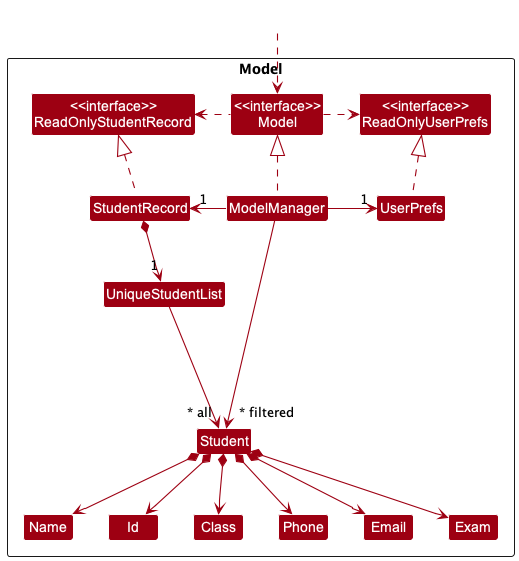
The Model component:
- stores the student record data i.e., all
Studentobjects (which are contained in aUniqueStudentListobject). - stores the currently ‘selected’
Studentobjects (e.g., results of a search query) as a separate filtered list which is exposed to outsiders as an unmodifiableObservableList<Student>that can be ‘observed’ e.g. the UI can be bound to this list so that the UI automatically updates when the data in the list change. - stores a
UserPrefobject that represents the user’s preferences. This is exposed to the outside as aReadOnlyUserPrefobjects. - does not depend on any of the other three components (as the
Modelrepresents data entities of the domain, they should make sense on their own without depending on other components).
4.1.4 Storage component
API : Storage.java
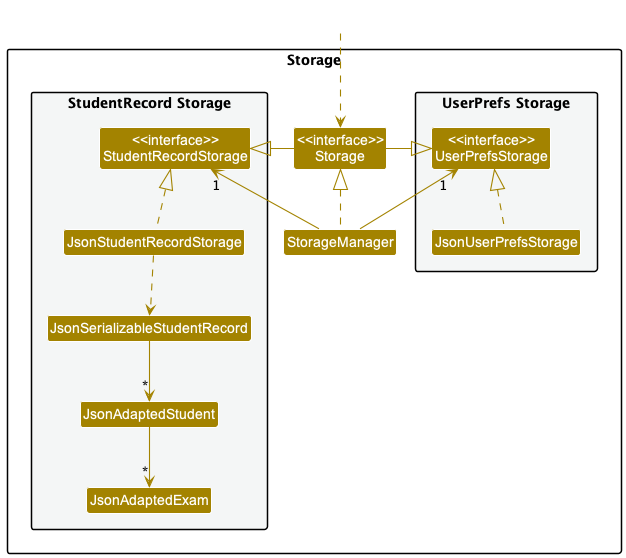
The Storage component,
- can save both student record data and user preference data in json format, and read them back into corresponding objects.
- inherits from both
StudentRecordStorageandUserPrefStorage, which means it can be treated as either one (if only the functionality of only one is needed). - depends on some classes in the
Modelcomponent (because theStoragecomponent’s job is to save/retrieve objects that belong to theModel).
4.1.5 Common classes
Classes used by multiple components are in the seedu.classify.commons package.
Click here to return to the top.
4.2 Implementation
This section describes some noteworthy details on how certain features are implemented.
4.2.1 AddStudent command
Description
Adding new students is first basic step of using Class-ify. This is primarily done via the AddStudentCommand and AddStudentCommandParser classes.
Before going into the sequence of executing a addStudent command, let us take a quick look at the Student class.

The Student class contains a total of 6 fields:
- 2
Namefields for the student and parent names - 1
Idfield - 1
Phonenumber field - 1
Emailaddress field - 1 set of
Exam(s)- The type of exams are currently limited to CA1, CA2, SA1 and SA2.
- Future implementations may allow teachers to create their own examinable items.
Implementation
Adding a student record can be divided into 2 main steps: parsing the user input and executing it.
Step 1: Parsing the command
The add student command is first parsed.
-
MainWindowcalls theexecutemethod ofLogicManagerto execute the given user’s command. - Before the command is executed, it is parsed by
StudentRecordParser, which identifies the command to be anaddStudentcommand and creates a newAddStudentCommandParserinstance to parse the user’s command. - Once the command is successfully parsed,
AddStudentCommandParsercreates a newAddStudentCommandinstance which will be executed by theLogicManager.
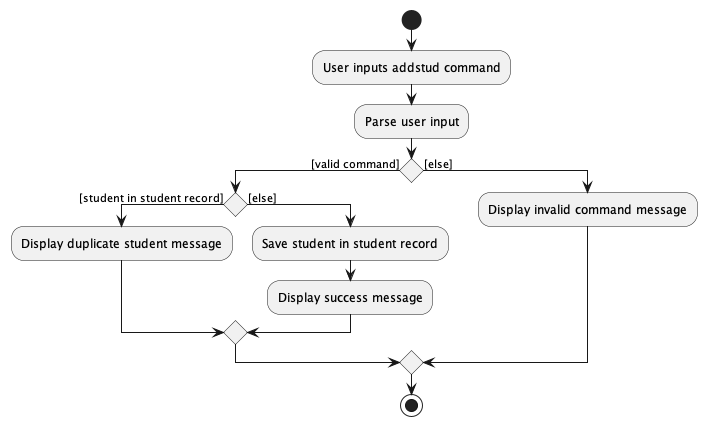
Step 2: Executing the command
The AddStudentCommand instance now interacts with the ModelManager to execute the command.
- The
hasStudentmethod is called to check if theModelcontains the student to be added. - Assuming there are no duplicates, the
addStudentmethod is then called to add the student into the student record. - The
updateFilteredStudentListmethod is called to show the updated list of students in the student record. - A new
CommandResultinstance is created and returned toLogicManager. - The control is then passed back to
MainWindowwhere theCommandResultis displayed to the UI as feedback to the user.
The following activity diagram below summarizes what happens when a user executes an addStudent command.
Design Considerations
The current approach creates multiple Class objects per student. It serves as a more straightforward implementation. However, it is not a very OOP solution for the following reasons:
- Multiple
Classobjects for the same class. - Classes do not have students.
- A
Classobject has no reference to the students in that class.
- A
An alternative and perhaps more OOP approach is given below. It has a Class list in the StudentRecord, which references to Student.
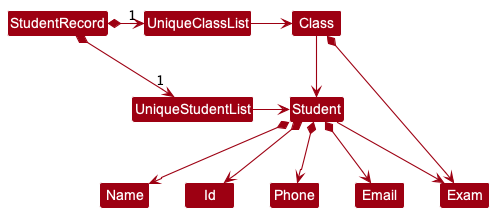
-
StudentRecordonly requires oneClassobject per unique class the teacher teaches, instead of eachStudentneeding their ownClassobjects. -
Classhas reference toStudent, modelling the relationship in which a teacher teaches a class with some students. - Every
Classhas a set ofExam(s) which aStudenttakes and scores a certain grade.
4.2.2 Delete command
Description
The delete command allows users to delete a student record by targeting either the student’s name or ID.
Implementation
Deleting a student record can be divided into 2 main steps: parsing the command and executing it.
The sequence diagram below illustrates the interactions within the Logic component when the user calls a delete command, for example, delete id/123A.
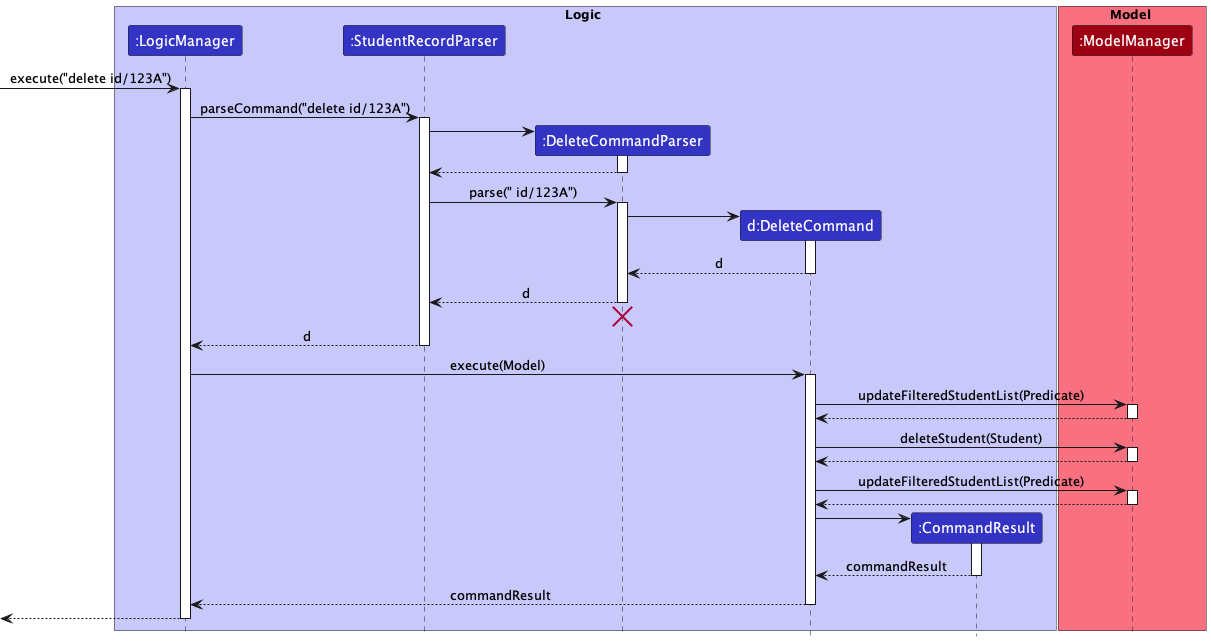
DeleteCommandParser should end at the destroy marker (X), but due to a limitation of PlantUML, the lifeline reaches the end of diagram.
Step 1: Parsing the command
The delete command is first parsed.
- The
executemethod ofLogicManageris called to execute the user’s command,delete id/123A. - Before the command is executed, it is parsed by
StudentRecordParser, which identifies the command to be a delete command and creates a newDeleteCommandParserinstance to parse the user’s command. - Once the command is successfully parsed,
DeleteCommandParsercreates a newDeleteCommandinstance which will be executed by theLogicManager.
Step 2: Executing the command
The DeleteCommand instance now communicates with the ModelManager to execute the command.
- The
updateFilteredStudentListmethod is called to isolate the student record to be deleted. - The
deleteStudentmethod is called to delete the student record. - The
updateFilteredStudentListmethod is called again to show all student records. - A new
CommandResultinstance is created and returned toLogicManager.
Design Considerations
-
Option 1 (Current design): We chose to keep a single class
DeleteCommand, which the user can use to delete student records either by targeting the student’s name or student ID. Note that we chose not to delete student records by their index in the list since deletion is irreversible, and we wanted users to be aware of the exact student name when they are executing aDeleteCommand.- Pros:
- The user does not have to remember different types of delete commands such as
DeleteStudentByNameCommandorDeleteStudentByIDCommand.
- The user does not have to remember different types of delete commands such as
- Cons:
- The parser would have to identify whether the user targeted the student’s name or student ID to delete the student record.
- Pros:
-
Option 2: Split
DeleteCommandinto two different commands,DeleteStudentByNameCommandandDeleteStudentByIDCommand.- Pros:
- There is no requirement for prefixes such as
nm/orid/to identify whether the user is targeting the student’s name or student ID.
- There is no requirement for prefixes such as
- Cons:
- Additional classes need to be implemented.
- The command name is long.
- Pros:
4.2.3 Edit command
Description
The EditCommand updates the student record at a given index. Under the hood, a new Student object is created to replace the student to be edited.
Implementation
Editing a student record involves 2 main steps:
Step 1: Parsing the command
-
After the user inputs the
EditCommand, theStudentRecordParserwill identify the command and create aEditCommandParserinstance in theLogicManager. -
The
EditCommandParserparses the rest of the user’s input and creates a newEditCommandobject which will be executed by theLogicManager.
Step 2: Executing the command
The EditCommand object now communicates with the ModelManager to execute the command.
-
The
createEditedStudentmethod is called to create a neweditedStudentwith the edited fields updated. -
The
editedStudentreplaces the student to be edited with thesetStudentmethod. -
The
updateFilteredStudentListmethod is called to show all student records. -
A new
Command Resultinstance is created and returned toLogicManager.
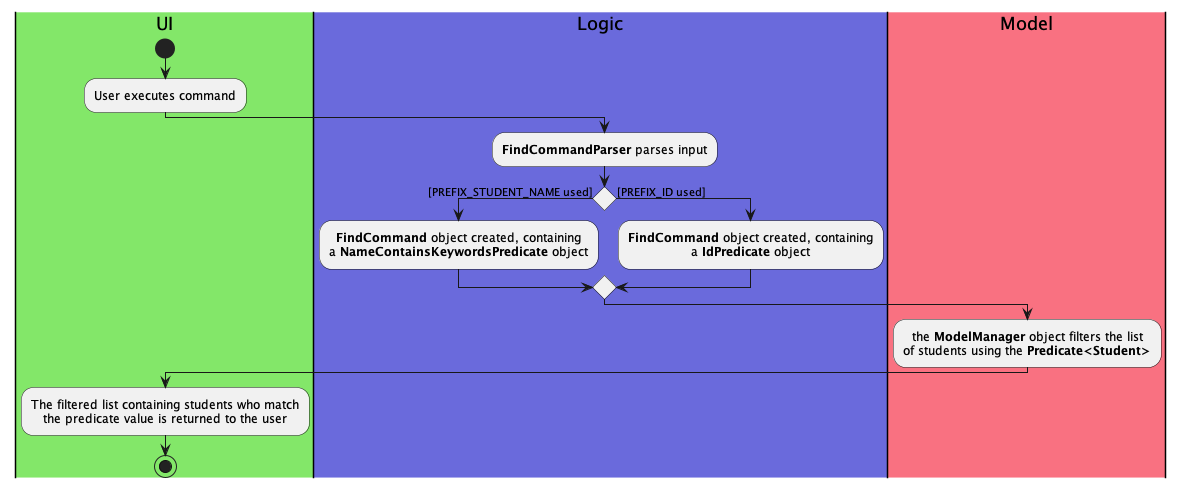
4.2.4 Find command
Description
FindCommand, which extends Command, simulates searching through the StudentRecord for particular students. This is implemented through filtering the current list of students according to the user input, and displaying the filtered results to the user.
Implementation
FindCommand is executed through 2 steps:
Step 1: Parsing the command
The user input is first parsed by StudentRecordParser, in the same way as other commands. After the input is identified to be a find command, a FindCommandParser instance will be created to further parse the command arguments.
The FindCommandParser searches the input for either PREFIX_STUDENT_NAME or PREFIX_ID (but not both), and depending on which Prefix is present, instantiates a NameContainsKeywordsPredicate object or IdPredicate object respectively. Both inherit from Predicate<Student>.
This Predicate<Student> will then be used to create a FindCommand object.
Step 2: Executing the command
The FindCommand object created will then interact with the ModelManager to execute the command.
- Using the
Preicate<Student>created when parsing the command,Model#updateFilteredStudentList(Predicate<Student>)is called, to filter the list of students. - The filtered list is returned to the user, and they will be able to view the list of students whose name contains the specified keyword(s), or whose Id matches the specified Id.
Usage scenario
Given below is an example usage scenario of FindCommand.
Step 1. The user launches the application and sees a list of students.
Step 2. The user executes find nm/Alex to locate students with “Alex” in their name.
This command performs a search using the names of the students. Since the prefix nm/ was used, a NameContainsKeywordsPredicate object, which extends Predicate<Student> will be created.
find nm/alex will return the same results.
Step 3. Classify returns a filtered list of students whose names contain Alex. All the details recorded will also be shown.
The following activity diagram summarizes what happens when a user executes the find command.
4.2.5 ViewAll command
Description
The viewAll command displays a list of all student records.
Implementation
The sequence diagram below illustrates the interaction between the Logic and Model components.
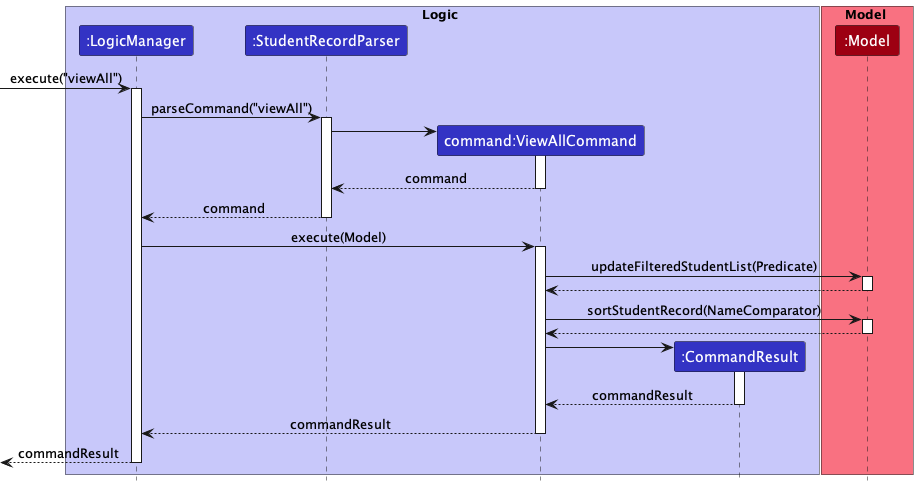
Given below is an example usage scenario of how the ViewAll mechanism behaves at each step.
Step 1. The user inputs “viewAll”.
Step 2. The StudentRecordParser will identify the command and create a ViewAllCommand object in the LogicManager.
Step 3. ViewAllCommand#execute is called which updates the FilteredStudentList in Model.
Step 4. Classify updates and displays a list of all student records.
4.2.6 ViewClass command
Description
The ViewClassCommand displays the list of students in a particular class. This feature relies mainly on the ViewClassCommandParser and ClassPredicate, where the ViewClassCommandParser uses ClassPredicate to select students in the student record with the mentioned class.
Implementation
This command can be divided into 2 main steps:
- Parsing the command
- Executing the command
The following Sequence diagram shows how the ViewClassCommand works:
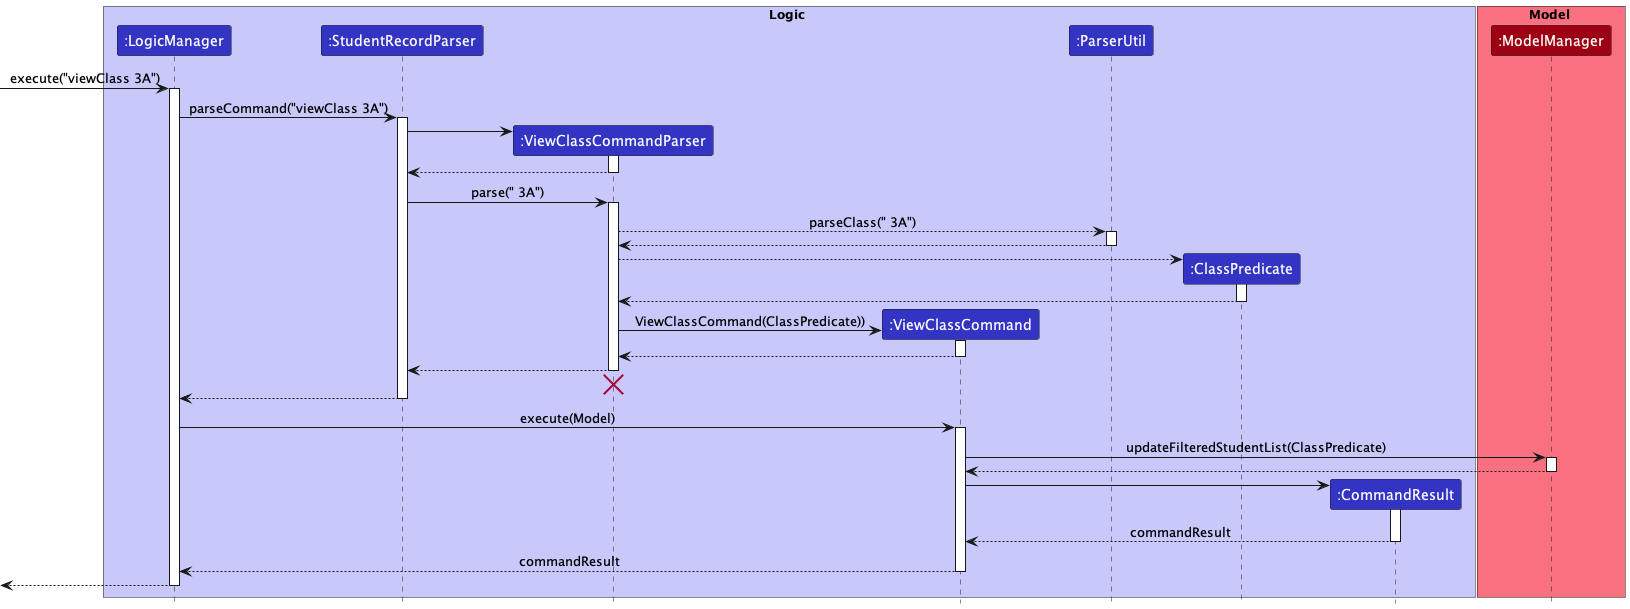
ViewClassCommandParser should end at the destroy marker (X), but due to a limitation of PlantUML, the lifeline reaches the end of diagram.
Step 1: Parsing the command
The user’s input command is first parsed.
-
MainWindowcalls theexecutemethod ofLogicManagerto execute the given user’s command. - Before the command is executed, it is parsed by
StudentRecordParser, which identifies the command to be aViewClassCommandand creates a newViewClassCommandParserinstance to parse the user’s input. -
ViewClassCommandParserchecks whether the user input is valid by parsing it into theparseClassmethod inParserUtil. - If the input is valid, a new
ClassPredicateinstance is created. -
ViewClassCommandParserthen creates a newViewClassCommandinstance which will be executed by theLogicManager.
Step 2: Executing the command
The ViewClassCommand instance now interacts with the ModelManager to execute the command.
- The
updateFilteredStudentListmethod is called with theClassPredicateto filter the list to only contain students whoseClassmatches the user input. - A new
CommandResultinstance is created and returned toLogicManager.
viewClass 1a and viewClass 1A will return the same results.
Design Considerations
- Option 1: Integrate
ViewClassCommandtogether withFindCommand, and users will find students in a specific class.- Pros: Users will not need to learn a different command.
- Cons: There is still a need to differentiate the filter logic as class name requires an exact match, while name only requires it to contain the keywords.
- Option 2 (Current Design): Separate
ViewClassCommandandFindCommand.- Pros: Distinguishing between a
ViewandFindcan make the filtering logic more obvious and apparent to users - Cons: Users have an additional command to learn.
- Pros: Distinguishing between a
4.2.7 ToggleView command
Description
The ToggleViewCommand toggles the application to display or hide all students’ parent details.
Implementation
The following activity diagram summarises the events that occur when the user executes the ToggleViewCommand.
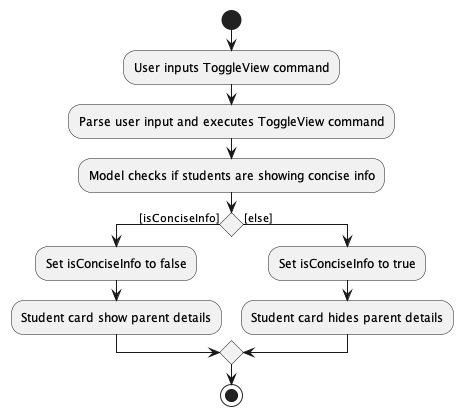
The Modelhas an association with FilteredStudent where FilteredStudent encapsulates the current toggle status and FilteredStudentList. Executing the command will change the toggle status. The StudentListPanel is dependent on the toggle status in FilteredStudent to display or hide the students’ parent details properly in the StudentCard.
Given below is an example usage scenario of how the ToggleView mechanism behaves at each step:
Step 1. The user enters the command toggleView.
Step 2. The StudentRecordParser will identify the command and create a ToggleViewCommand object in the LogicManager.
Step 3. ToggleViewCommand#execute is called which toggles isConciseInfo in FilteredStudent.
Step 4. To rerender the update, ToggleViewCommand calls updateFilteredStudentList with the previously stored predicate. This triggers the listener in StudentListPanel to update the StudentListViewCell.
Step 5. With the new isConciseInfo status, StudentListViewCell creates the new StudentCard that shows/hides parent details accordingly.
With the above sequence, the UI is successfully updated to display the relevant student details according to the toggle status.
Design Considerations
- Option 1: Each
Studenthas aisShowingParentDetailsbooleanattribute.- Pros:
- Does not introduce coupling between UI and Model.
- Cons:
- Each execution of the command edits and replaces all the students in the
FilteredStudentListwith newStudentobjects with the updated attribute which can be costly when there are many student objects.
- Each execution of the command edits and replaces all the students in the
- Pros:
- Option 2 (Current design): updates
FilteredStudentListsuch that it triggers the listener inStudentListPanelto update theStudentListViewCell.- Pros:
- No need to edit every student in the
FilteredStudentList. - Attribute is associated with the list and not each student. Only need to maintain 1 attribute.
- No need to edit every student in the
- Cons:
- Increase coupling between UI and Model.
- Pros:
4.2.8 ViewStats command
Description
ViewStatsCommand is a Command to present summary statistics for an Exam taken by a particular class of students.
In particular, the command is implemented to generate the mean score of the Exam. The entire process of generating summary statistics is executed in 2 steps.
Implementation
Step 1: Parsing the command
The user input is first parsed, in the same way as other commands. After the input is identified to be a viewStats command, a ViewStatsCommandParser instance will parse the inputs to retrieve the class and exam of interest.
Furthermore, the command will also be parsed to retrieve an input for an additional Prefix “filter/”, which will indicate if the list of students returned should be flagged. A flagged list contains only students whose score for that particular Exam falls below the mean.
Step 2: Executing the command
The ViewStatsCommand then interacts with the ModelManager to execute the command, which is again done in 2 steps.
Step 1: A ViewClassCommand is executed, depending mainly on Model#updateFilteredStudentList(Predicate<Student), in order to retrieve the class of interest.
Step 2: The mean of the exam scores for that class is calculated using Model#calculateMean(String exam).
Depending on the boolean value returned during the parsing of the filter prefix, the class list is further filtered using Model#updateFilteredStudentList(Predicate<Student) to show a flagged list.
The whole list is sorted according to the score of the particular exam, before it is returned and displayed to the user.
The following sequence diagram depicts how different components such as Logic and Model interact.
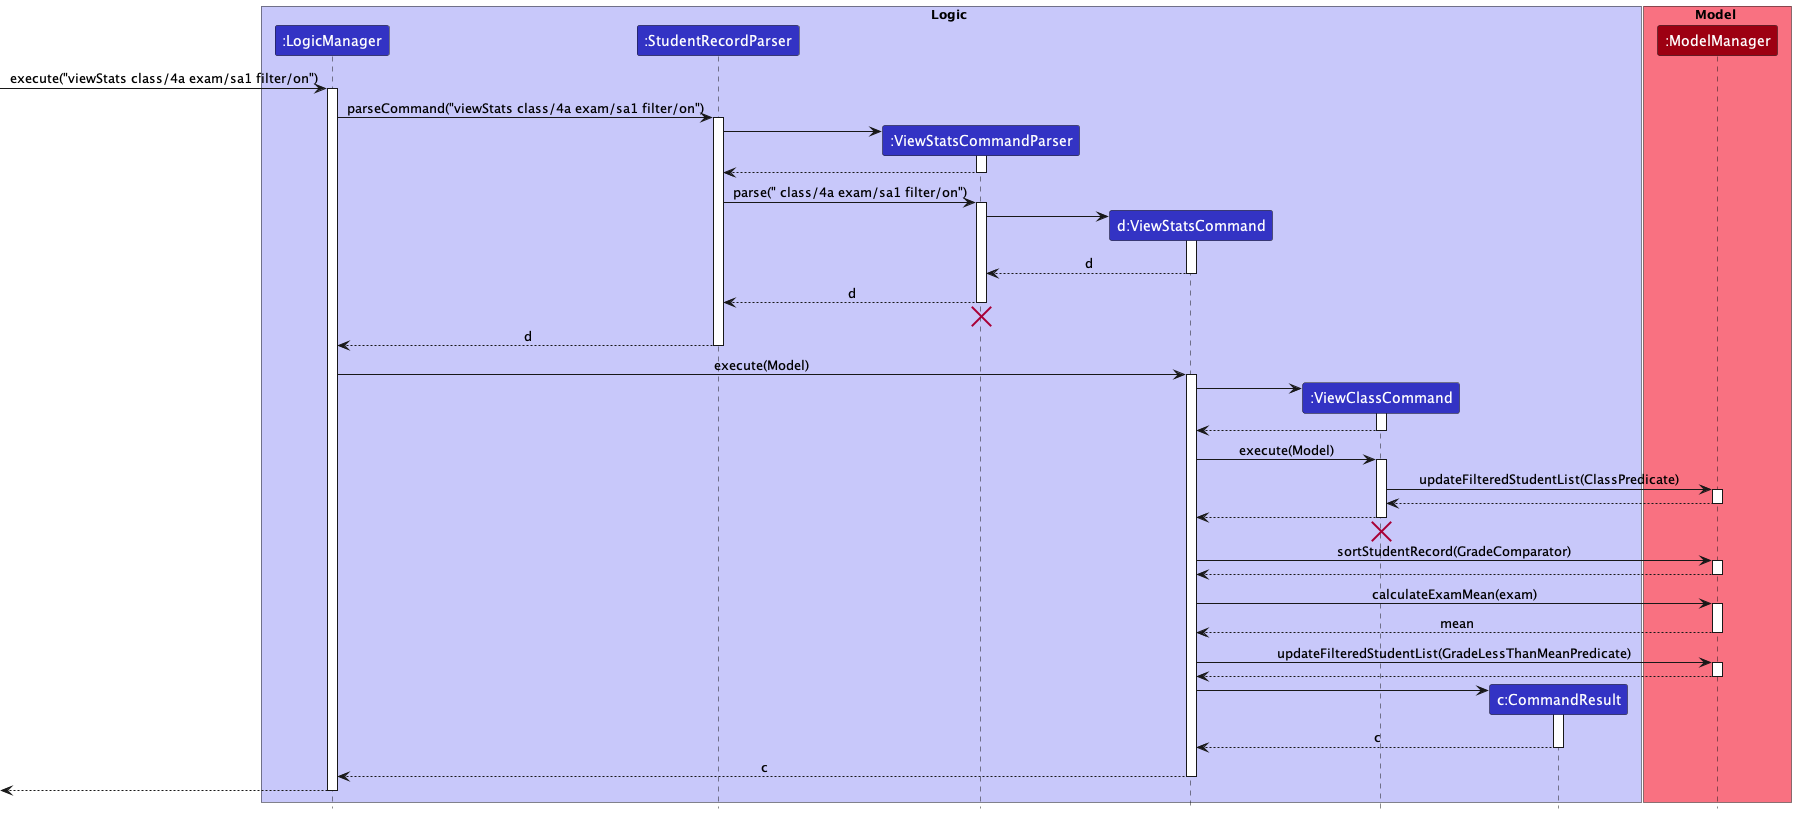
ViewStatsCommandParser and ViewClassCommand should end at the destroy marker (X), but due to a limitation of PlantUML, the lifeline reaches the end of diagram.
Design Considerations
Sorting the list of students according to grade
- Option 1: sort the filtered list of students after retrieving the class.
- Pros:
- Will not modify the current
StudentRecord. - Will not unnecessarily sort students not in the class of interest.
- Will not modify the current
- Cons:
-
FilteredStudentsis meant to be unmodifiable, and sorting potentially breaks this behaviour. -
FilteredStudentsis implemented withFilteredList<Student>which does not maintain sorting, so additional wrapping needs to be done to sort the filtered list.
-
- Pros:
- Option 2 (Current design): sort the entire student record, then filter to retrieve class.
- Pros:
- Can maintain sorting even beyond the
ViewStatscommand, ie. maintaining a sorted list of students, sorted by name, each time anaddStudentcommand oreditcommand is run.
- Can maintain sorting even beyond the
- Cons:
- Reorders the whole
StudentRecordeach time the sorting is done.
- Reorders the whole
- Pros:
Click here to return to the top.
5. Documentation, logging, testing, configuration, dev-ops
Click here to return to the top.
6. Appendix: Requirements
6.1 Product scope
Target User Profile
Ministry of Education (MOE) Teachers who:
- Teaches 3 to 5 classes a year.
- Manages about 60 to 100 students with varying needs.
- Is required to identify students who need additional academic assistance and contact their parents if necessary.
- Finds paperwork time-consuming and messy.
- Finds it tedious to manually keep track of the academic progress of each individual student.
- Finds it tedious to manually identify students who are performing poorly academically.
- Finds Excel spreadsheet’s functions and formulas complex and difficult to use.
- Prefers typing to mouse interactions.
- Types fast and is reasonably comfortable using CLI apps.
Value Proposition
Class-ify is a class management application built specially for Singapore Ministry of Education (MOE) teachers to monitor their student’s academic progress easily. Teachers can generate exam statistics for each class, and Class-ify quickly flags out students who require more support for contacting.
6.2 User stories
Priorities: High (must have) - * * *, Medium (nice to have) - * *, Low (unlikely to have) - *
| No. | Role (As a/ an) | Goal/ Function (I want to) | Benefit (So that I can) | Priority |
|---|---|---|---|---|
| 1 | Teacher using Class-ify regularly | Create new records for the students I am teaching | Manage my students’ information on Class-ify | *** |
| 2 | Teacher using Class-ify regularly | Make changes to the student record | Keep my student records accurate and up to date | *** |
| 3 | Teacher using Class-ify regularly | Delete individual student record | Remove irrelevant or past student records | *** |
| 4 | Teacher using Class-ify regularly | Clear all student record | Start on a clean state | *** |
| 5 | Teacher using Class-ify regularly | View a list of all my students I am teaching | Have an overview of all my students | *** |
| 6 | Teacher using Class-ify regularly | Find the record of a student by his/ her name | Save time looking through a long list of students | *** |
| 7 | Teacher using Class-ify regularly | Find the record of a student by his/ her ID | Save time looking through a long list of students | *** |
| 8 | Teacher using Class-ify regularly | Add details of the student’s parent | Contact the parents when necessary | *** |
| 9 | Teacher using Class-ify regularly | Add my student’s grades for CA1, CA2, SA1 and SA2 | Keep track of their performance | *** |
| 10 | Teacher using Class-ify regularly | Save the records of my students I have entered | Continue working on them after closing Class-ify | *** |
| 11 | Teacher using Class-ify regularly | Create additional custom fields in the student records | Keep track of additional information of my students | ** |
| 12 | Teacher using Class-ify regularly | Undo previous commands | Revert any accidental changes I made | ** |
| 13 | Teacher with many classes | Organise my students into their classes | Keep my records organised and tidy | *** |
| 14 | Teacher with many classes | View a list of all my students in a class | Have an overview of all my students in the class | *** |
| 15 | Teacher with many classes | Hide parental information from view | Have an uncluttered view of my students | *** |
| 16 | Teacher using Class-ify for the first time | Have some sample records of students | See how Class-ify will look like when it is in use | ** |
| 17 | Teacher using Class-ify for the first time | Delete all sample records of students | Start adding in my own students | *** |
| 18 | Teacher using Class-ify for the first time | See a summary of operations I can perform on Class-ify | Have an idea of what I can do | ** |
| 19 | Teacher using Class-ify for the first time | Follow a tutorial of Class-ify | Learn to navigate the application step by step | * |
| 20 | Teacher who is experienced using Class-ify | Transfer and backup the records from one computer to another | Switch to another computer without losing all the records | * |
| 21 | Teacher who is experienced using Class-ify | Add multiple records of students at once | Save time adding students one by one | ** |
| 22 | Teacher who is experienced using Class-ify | Find out more advanced commands through suggestions | Learn and extend the functionality of Class-ify | * |
| 23 | Teacher who is experienced using Class-ify | Hide sensitive information | Prevent unauthorised access of my student’s personal information | * |
| 24 | Teacher giving exam feedback | View the grades of any of my students | Get an understanding of their results | *** |
| 25 | Teacher giving exam feedback | Get the mean score of my class for an exam | Understand the overral performance of my class | *** |
| 26 | Teacher giving exam feedback | Find out students who are under performing in my class | Identify who needs more assistance | *** |
| 27 | Teacher giving exam feedback | Sort the record of my students in terms of their grades | View the academic rankings of my students | *** |
| 28 | Teacher giving exam feedback | Filter a list of students who scored above a certain grade | Reward them for their good results | ** |
| 29 | Teacher taking the same class for the next year | Update the class name of all students in the class | Save time editing the records one by one | ** |
| 30 | Teacher who made a grading error | Update multiple records with the new score | Save time editing the records one by one | ** |
6.3 Use cases
(For all use cases below, the System is Class-ify and the Actor is the user, unless specified otherwise.)
Use case: Add a new student
MSS
- User requests to add a new student to the list.
- User enters relevant details of the new student.
- Class-ify adds new student into the student record.
-
Class-ify displays an updated list of student(s).
Use case ends.
Extensions
- 2a. Student already exist in student record.
-
2a1. Class-ify displays a duplicate error message.
Use case resumes from step 2.
-
- 2b. User missed out a compulsory field.
-
2b1. Class-ify shows an invalid command error message.
Use case resumes from step 2.
-
- 2c. Class-ify detects invalid format of field value.
-
2c1. Class-ify shows an invalid format error message.
Use case resumes from step 2.
-
Use case: Delete a student
MSS
- User requests to delete a student from the list.
- User enters name or id of student to be deleted.
- Class-ify deletes student from the student record.
-
Class-ify displays an updated list of student(s).
Use case ends.
Extensions
- 2a. Student does not exist in student record.
-
2a1. Class-ify displays an error message indicating the to-be-deleted student does not exist.
Use case resumes from step 2.
-
- 2b. The student record is empty.
-
2b1. Class-ify displays an error message similar to 2a1.
Use case resumes from step 2.
-
- 2c. Class-ify detects invalid format of field value.
-
2c1. Class-ify shows an invalid format error message.
Use case resumes from step 2.
-
Use case: Edit details of a student
MSS
- User requests to edit the details of a student from the list.
- User enters index of student in the list to be edited.
- User enters the relevant details of the student to be edited.
- Class-ify updates the details of the student in the student record.
-
Class-ify displays an updated list of student(s).
Use case ends.
Extensions
- 2a. The given index is invalid.
-
2a1. Class-ify displays an invalid command error message.
Use case resumes from step 2.
-
- 2b. The given index is out of bounds of the list.
-
2b1. Class-ify displays an error message similar to 2a1.
Use case resumes from step 2.
-
- 3a. Class-ify detects invalid format of field value.
-
3a1. Class-ify shows an invalid format error message.
Use case resumes from step 3.
-
- 3b. No given fields to be edited.
-
3b1. Class-ify shows an error message to prompt user to enter at least one field to be edited.
Use case resumes from step 3.
-
Use case: Find a student
MSS
- User requests to find some student(s) in the list.
- User enters name or id of the student(s) to be found.
- Class-ify search for the student(s) in the student record.
-
Class-ify displays a list of student(s) found.
Use case ends.
Extensions
- 2a. No fields are given.
-
2a1. Class-ify displays an invalid command error message.
Use case resumes from step 2.
-
- 2b. Class-ify detects invalid format of field value.
-
2b1. Class-ify shows an invalid format error message.
Use case resumes from step 2.
-
- 4a. No students are found.
-
4b1. Class-ify display an empty list and a message indicating no students are found.
Use case ends.
-
Use case: Calculate exam statistics
MSS
- User requests to calculate exam statistics for a class.
- User enters the class and exam that he/she wishes to calculate statistics for.
- Class-ify calculates the average score in the class for the exam.
-
Class-ify displays the list of students in the class in order of ascending grades.
Use case ends.
Extensions
- 2a. No fields are given.
-
2a1. Class-ify displays an invalid command error message.
Use case resumes from step 2.
-
- 2b. Class-ify detects invalid format of field value.
-
2b1. Class-ify shows an invalid format error message.
Use case resumes from step 2.
-
- 2c. Not all students have received grades for the exam.
- 2c1. Class-ify shows an error message stating mean score cannot be calculated.
6.4 Non-Functional Requirements
-
Technical Requirement:
- Class-ify should work on any mainstream operating system (OS) as long as it has Java version 11 or above installed.
- Class-ify should work on both 32-bit and 64-bit environments.
-
Quality Requirement:
- Display of information on the application should not feel disorganised or cluttered.
- Colour scheme of Class-ify should be pleasant for most users and not cause a strain to the eye.
-
Performance Requirement:
- Class-ify should be able to process any command within two seconds.
- Class-ify Should be able to hold up to 200 students in the student record without a noticeable lag in performance.
-
Project Scope:
- Class-ify does not offer student or parent accounts, and hence no communication with students or their guardians via the application.
- Class-ify does not allow synchronisation of class lists with other teachers, but allows for sharing of data between teachers.
-
Others:
- A user with above average typing speed for regular English text (i.e. not code, not system admin commands) should be able to accomplish most of the tasks faster using commands than using the mouse.
6.5 Glossary
- Mainstream OS: Windows, Linux, Unix, OS-X
- CLI: Command Line Interface (CLI) is a text-based User Interface (UI) used to run programs. Through the CLI, users interact with the application by typing in text commands
- GUI: Graphical User Interface (GUI) is an interface that allows the user to interact with through various visual graphics.
- MSS: Main Success Scenario (MSS) describes the most straightforward interaction for a given use case, which assumes that nothing goes wrong
- 32-bit/64-bit environment: Refers to systems that use a 32-bit/64-bit processor respectively.
Click here to return to the top.
7. Appendix: Instructions for manual testing
Given below are instructions to test the app manually.
7.1 Launch and shutdown
- Initial launch
- Download the jar file and copy into an empty folder
- Double-click the jar file
- Expected: Shows the GUI with a set of sample contacts. The window size may not be optimum.
- Saving window preferences
- Resize the window to an optimum size. Move the window to a different location. Close the window.
- Re-launch the app by double-clicking the jar file.
- Expected: The most recent window size and location is retained.
7.2 Adding a new student record
Prerequisites: Existing student records do not have the names or IDs that will be added.
- Test case 1:
addStudent nm/Peter Tan id/452B class/1F- Expected: A new student record with the provided details is added to the list. Details of the student record are shown in the status message. Since no exam grades have been provided, the student card UI does not show anything below the grades section.
- Test case 2:
addStudent nm/Alex Yeoh id/123A class/2B exam/CA1 60 exam/CA2 70- Expected: A new student record with the provided details is added to the list. Details of the student record are shown in the status message. Since exam grades have been provided, the student card UI shows the exam scores for each exam that has been provided.
- Test case 3:
addStudent nm/John Doe id/928C class/1A pn/Bob Doe hp/98765432 e/bobdoe@gmail.com exam/CA1 50- Expected: A new student record with the provided details is added to the list. Details of the student record are shown in the status message. This test case includes parents’ details as well.
- Test case 4:
addStudent nm/Jonathan Lim id/abc2 class/2A- Expected: The command entered by the user is highlighted red. The status message shows an error: “Id should only contain 3 digits and 1 character”. “abc2” is an invalid value for the ID as Class-ify only accepts the last 3 numbers and last letter of a student’s ID.
7.3 Editing a student record
Prerequisites: There are at least 2 student records in classify and no students have the name ‘Jacob Teo’.
- Test case 1:
edit 1 exam/CA2 70 exam/SA1 60- Expected: Adds or updates the CA2 and SA1 exam grades of the 1st student in the list to be
70and60respectively.
- Expected: Adds or updates the CA2 and SA1 exam grades of the 1st student in the list to be
- Test case 2:
edit 2 nm/Jacob Teo- Expected: Edits the name of the 2nd student in the list to
Jacob Teo.
- Expected: Edits the name of the 2nd student in the list to
7.4 Deleting a student record
Prerequisites: A student with name “Alex Yeoh” and ID “123A” exists in Classify.
addStudent nm/Alex Yeoh id/123A class/1A after Test case 1 to add the student record back into classify.
- Test case 1:
delete nm/Alex Yeoh- Expected: Alex Yeoh’s student record is removed from the list. Details of the deleted student record are shown in the status message.
- Test case 2:
delete id/123A- Expected: Similar to expected result in Test case 1.
- Other incorrect delete commands to try:
delete,delete x- Expected: The command entered by the user is highlighted red. The status message shows invalid format error message.
7.5 Finding a student record
Prerequisites: Students with “Alex” in their name or “123A” as their ID exist in the list. You may use addStudent nm/Alex Yeoh id/123A class/1A to add the student record into Classify.
- Test case 1:
find nm/Alex- Expected: Students with “Alex” in their name appears in the list.
- Test case 2:
find id/123A- Expected: Student with “123A” as their ID appears in the list.
7.6 Viewing all student records
Prerequisites: There are existing student records.
- Test case:
viewAll- Expected: All student records will appear in the list.
7.7 Viewing student records from a class
Prerequisites: Class provided must exist within the student records.
- Test case:
viewClass 1A- Expected: Student records from class 1A will appear in the list.
7.8 Toggling view
Prerequisites for Test case 1: Classify currently shows the parent details in each student card UI.
- Test case 1:
toggleView- Expected: Hides parent details in each student card UI.
Prerequisites for Test case 2: Classify currently hide the parent details in each student card UI.
- Test case 2:
toggleView- Expected: Shows parent details in each student card UI.
7.9 Calculating exam statistics
Prerequisites: Student records with class “4a” and exam results for “sa1” exists.
- Test case:
viewStats class/4a exam/sa1 filter/off- Expected: Displays the mean obtained by class “4A” for “SA1”, as well as the list of all the students in the class ‘4A’, arranged in ascending grades for “SA1”.
7.10 Saving data
Prerequisites: Missing data/classify.json file
- Test case: Delete
data/classify.jsonfile and relaunch the application.- Expected: Application will be populated with sample data.
Click here to return to the top.